Showing posts with label blog. Show all posts

Saturday, May 18, 2013

Star Trek Blog Hop: Cupcakes!


I'm so excited to be participating in Katie's Star Trek blog hop today! There are many other bloggers with great projects. To find the whole list, scroll to the bottom of this post. I'm happy to share with you my project, Star Trek-themed cupcakes! I've included a tutorial for several designs below!

Star Trek Uniform:
1. Ice in red, blue, or gold (eat the redshirts first!) The easiest was to get a smooth cupcake is to ice a very thick layer on first, making sure you go all the way to the edges, and then hold your spatula vertically against the cupcake and scrape off excess icing from the sides. Then, hold your spatula level horizontally with the top of the cupcake and very lightly skim across it for a smooth finish. 
2. The uniform details are quite easy, just a black triangle for the top and pipe on the insignia!


Star Trek Enterprise:
1. This cupcake is more show than tell, so ice the cupcake (as discussed in the previous tutorial), and then, using grey icing, pipe on the general outline of the enterprise. Fill in the shape.
2. Using black icing, add teeny details on the various parts of the ship.


Star Trek Faces:
1. Ice in skin-colored icing. Then pipe on the facial details. I found it easiest to pipe in this order: hair, face, eyebrows. Easy-peasy!

TIPS:
1. You can use a toothpick to mark out a pattern for piping. I did this with Kirk and Spock's hair and found it very helpful.


2. Get crafty and make speech bubbles! Our quotes are from the new series and were a cute addition to the Starfleet uniform cupcakes.


Thanks for reading! 
-Taylor


Pin It!

Friday, March 29, 2013

Sugared Lime Spring Wreath DIY


I found this website, Design Seeds, through my sister Katie. Anyway, I need I wanted to make a spring wreath, and when I saw this beautiful color scheme of various limes on Design Seeds that I had my inspiration. I love how bright lime can be, yet in this color scheme, the lime is subtle and serene. Enjoy my wreath tutorial below and my take on these beautiful shades of spring green.

Supplies:
Paper Flowers
Ribbon Scraps in different shades of lime green
Plain Straw Wreath
Muslin or Canvas Scrap 12" long (to hang the wreath with)
White Acrylic Paint
Lace Paper Doilies


1. Paint on polka dots first. I used a cosmetic sponge to make my dots, but if you don't already have a circular sponge, you could easily cut one from a regular sponge.


2. Tie your muslin scrap onto the top of the wreath. Layer your ribbons on one side of the wreath and pin in place. 


3. Hot glue ribbons in place at the top of each ribbon. Add a lace paper doily on top of the ribbons.


4. Glue paper flowers on top of lace doily. Arrange the flowers in an odd number for the most aesthetic appeal. Three or five flowers will look best. 


5. Enjoy your wreath, hang it in the sunshine to greet your spring visitors and enjoy your spring!


Pin It!

Wednesday, February 27, 2013

A Guide to Storytelling

Once upon a time...


Good morning everyone,

As you know, this week's theme on my blog is writing and being better at it. I'd like to take a moment to encourage you, especially if you think you aren't a good writer. There are lots of different types of writing; finding one that works for you is the key to thinking and feeling like a good writer. Today, I'm talking about storytelling. This is not something we typically think of when we talk about craft blogging, but it certainly can be a fun and important part of your writing.

This infographic on the left is Pixar's Guide to Storytelling, which I found both highly creative and inspiring. Often when we start to write something personal or story-like on our blogs, we don't know where to begin, what to share, what not to share, and so on. I wanted to share this infographic because it includes some important steps in storytelling and more importantly, in what order they should go.

And they all lived happily ever after...

 I think it's extremely important to know the outcome (the ending) before writing the body of a blog post or a story. It's easy to get off track or distracted without knowing the outcome and when this happens, it means the reader will get just as lost as well. Lost readers are bad...lost readers lose interest, which is exactly what we all want to avoid.

Write just to write. Nothing more.


It's also important to realize that not every story you start will be finished. And this is okay. Finishing is, obviously, the goal, but sometimes it's more important to simply start and practice your skill rather than to have a final product. Writing is a process, one that is repeated over and over, and really requires no ending to still be considered good writing. Writing without an ending will help you push your boundaries and make you more comfortable telling stories on your blog or in your other writing.

Share your stories...


Having just said it's okay to not finish a story, I'd like to say at this point, that you really should finish and publish your favorite stories. If you love them, chances are your readers will too.

Don't be afraid.

It's often scary to put our most beloved projects out on display for fear of rejection or even simply disinterest. I know in my own experiences, I often feel that with such a new blog my posts are wasted because so few people read them and I receive so little feedback. But I have to remind myself that if you write it they will come (quality writing that is). New blogs often struggle in this way. It takes time. But this time can be easily used as a way to practice and hone your art of storytelling and writing.

When you write your stories and share your words you are writing something that no one else can. No one else will interpret an occasion the way that you will and no one will express creativity exactly the same as yours. Take courage in the fact that everything you write is uniquely yours.

Be brave and be brave often. Write often.

-Taylor


Interested in other writing articles? Scroll down to see previous posts from this week about writing, including my best tips!
Pin It!

Tuesday, February 26, 2013

Be a Better Writer: Tips for Writing Better Posts Part II


Below is the second part of a series of articles I've written about writing better blog posts and becoming a better writer in general. I write these tips form my experiences as a both a graduate student who writes papers regularly and as a teacher oh reads and grades what other people write. Use these tips to help you write in ways your readers will enjoy!


Write an Outline
     The concept of internet blogging started as a way to express thoughts and present them to other people. However, blogging has become much more than that and now we, as readers, want and expect the blog posts we read to be organized and flow smoothly from beginning to end. As a writer, this means you should have an outline of your blog post. It will help you write logically, keep you on track, and allow you to finish faster, making you more productive. 

Check for Sufficiency
     Whether you are posting a recipe, a crafty DIY, or a personal story on your blog, you should be reading through what you've written to decide whether or not you've included enough information to get your point across. A recipe or a craft tutorial can fail if you've missed a key step in the instructions. A personal anecdote won't make much sense if you've left out too many details. Be sure what you're writing is sufficient to the reader. 

Be Relevant
     Now that you've worked on writing sufficiently, read your posts again to make sure you aren't going overboard. It's easy to accidentally include too much information. Maybe you've got a really funny story about your child or your pet that you want to share. This is fine of course, but share it at a time when it's relevant. Make it a separate post; don't let too much information overwhelm the high quality work you've written. 
Proofread
      Good writing does not come instantly and it does not come on the first try. Good writing is a result of good editing. I cannot stress this enough: PROOFREAD your posts and your readers will thank you. Use a spell-check, and then read through your posts to check for grammatical errors that the spell-check does not pick up. Mistakes in blog posts are signs of a careless writer and they are a distraction. Good writing, free of proofreading errors will allow your readers to focus on your content.

Enjoy these tips? See Part I of this series, posted yesterday. Check back tomorrow for even more tips! -Taylor
Pin It!

Monday, February 25, 2013

Be a Better Writer: Tips for Writing Better Blog Posts Part I

Below is the first part of a series of articles I've written about writing better blog posts and becoming a better writer in general. I write these tips form my experiences as a both a graduate student who writes papers regularly and as a teacher oh reads and grades what other people write. Use these tips to help you write in ways your readers will enjoy!

Make Lists of Ideas
    To be a better writer, you should take a look at the topics you're writing about. Making lists by topic or season will help you focus your ideas and determine what goes into each post. This technique will also help you brainstorm new topics to write about and help you when you're in "I don't know what to blog about" panic.
Start Small
    To practice better writing skills, work on improving your posts in small doses. Really focus on improving the smallest topics you write about first, and then tackle the larger ones. Pay attention to what your weaknesses and strengths are in your writing.

Take Time to Write Your Posts
    The steps that go into writing well (outlines, content, proofreading) take time and if you want to write well, you can't rush through them. Take some time before you begin to figure out what you want to say, this helps prepare you for the actual writing. 

Write Quality, Not Quantity
     The key to good writing is not to write as much as you possibly can. It's also not to find as many sources to discuss or the be as funny, or serious as you can. The key to good writing is to write something that you would read and think," this is really good quality." Don't focus on writing long posts, focus on writing something worth reading.

Enjoy these tips? Stay tuned for more tips all week! 
Pin It!

Sunday, February 24, 2013

Writing Rules to Follow


This week, all the posts on this blog will focus on writing and blogging. I hope this inspires you to break out of your comfort zone! We all need to do that sometimes...change is good. Change is creative and change is a habit of creative people. Changing your writing style, in large or small ways, will help you not only reach more readers but reach your loyal ones more effectively. 

Check back all week for tips and thoughts about writing.
-Taylor

Pin It!

Wednesday, February 20, 2013

Scrapbooking Instax photos


Today, I thought I would share with you a pretty scrapbook page I whipped up. I've been having loads of fun taking photos with my Fuji Instax Mini camera, which takes instant photos. Now, the thing about instant photos is that they aren't digital and there is no editing them, which is both good and bad. So it's taken some practice for me to get good photos. But I also love how fast I can have photos directly at my fingertips and ready to scrapbook with. 


This page features photos I have taken of flowers that my boyfriend has given me on various occasions. Flowers are so bright and colorful, it's a great way to practice taking photos with a point and shoot instant camera.


What are your favorite things to take photos of? I also take a lot of pictures of my cat.
Want to see another great idea for using your instant photos? Check out this DIY.
-Taylor
Pin It!

Tuesday, February 19, 2013

Tips for New Bloggers-Interview Series-Kam of Campfire chic


This Spring, I'm hosting a series of interviews with accomplished and talented bloggers. We're talking about tips for us newbies and they've got some amazing answers. So, follow along, and learn with me from some of the best craft and lifestyle bloggers out there! 


Today's interview is with Kam of Campfire Chic. Here's her story: Campfire Chic is my story as a crafty camper. I share my story as a 9-5er looking for adventure and a handmade life. The posts I share encourage my readers to take risks and try new things, like camping, rock climbing, and yoga, while maintaining their current interests and responsibilities. Campfire Chic is about accepting challenges, setting achievable goals, and documenting the journey toward the finish line. I search out and share different methods for organization and goal setting because I believe that these can lead to a more productive life...which leaves plenty of time for more adventure! Campfire Chic allows me document my journey to adventure...the tale of a crafty camper.


1.      What's one super simple thing that every new blogger should be doing with their posts?
    There are quite a few things a blogger can do with a new post, but the most important? Proofread! I can’t tell you how silly I feel when I’m sitting at work glancing through my blog post for the day on my phone only to see a huge spelling/grammatical error. It’s the worst! I know that I can’t get home to fix it for a few hours, and by then, the post isn't as fresh. Proofreading your work before publishing is important. If you’re not willing to put the work in to publish good work, why should somebody read it?


2.      Did you have an 'Aha!' moment when you first started blogging that has helped you greatly? (How to do something, a nifty new trick, etc)
    My biggest Aha! Moment was when I realized I could give myself permission to not post 7 days a week. My analytics showed that my readership drops significantly on Saturday and Sunday, so why bother publishing perfectly good content on those days? Don’t feel pressured to have to stick to a specific “you’ll only be taken seriously if…” kind of schedule. Go ahead and only post on Monday, Wednesday, and Friday! Go ahead and only post once a week!

3. What's been your experience working with other bloggers and what kind of networking do you recommend?
    I have three years of experience working with other bloggers in different ways. I submit guest blog posts, host and participate in blog parties, co-host a semi-annual journaling challenge known as 30 Days of Lists, contribute to ebooks, you name it! Depending on your niche, I would avoid calling it networking and thinking more along the lines of building relationships. Some of these relationships are going to be more professional in nature, but it is still a relationship!

     When interacting with other bloggers, I suggest being yourself, being honest with deadlines and expectations, and being open to possibilities. Maybe you were hoping to get a guest blog post from a sewing blogger but ended up planning a co-hosted series of posts! The possibilities are endless, it just takes a little bravery to jump on board. 


Thanks Kam for a great interview! What I love about Kam's blog is her mix of crafty and DIY lifestyle things with informative and interesting posts about being a blogger. She has some amazing articles about meeting your blog goals and being more productive! Thanks for reading and check back soon for more interviews!
Pin It!

Tuesday, February 12, 2013

Tips for New Bloggers-Interview Series- Katie of Punk Projects


This Spring, I'll be hosting a series of interviews with accomplished and talented bloggers. We're talking about tips for us newbies and they've got some amazing answers. So, follow along, and learn with me from some of the best craft and lifestyle bloggers out there! 
Today's interview is with Katie of Punk Projects. Katie is a DIY artist of all sorts-mixed media, scrapbooking, painting, sewing, jewelry-making and so much more. Her publications include Creating Keepsakes, she will be featured in a craft book coming out Summer 2013, and is on several design teams. In addition, she runs her own blog design business. She also happens to be my amazingly talented sister! Read below for her tips for new bloggers!


1. What's one super simple thing that every new blogger should be doing with their posts?
Promote them! I recommend frequently posting about your blog on both facebook and twitter, as well as submitting your posts to other blogs, like CraftGossip.
2. Did you have an 'Aha!' moment when you first started blogging that has helped you greatly? 
Most of my “Aha” moments have been photography and photo editing related. My best suggestion is to work on your own photography, and if you don’t own a software like Photoshop (which can be expensive, I know. I’m lucky to have won a copy in a contest!) try using an online photo editor, like PicMonkey and learn how to edit your photos.
3. What's been your experience working with other bloggers and what kind of networking do you recommend?
I’ve done a lot of guest posting on other blogs, and having other bloggers post on my blog. Guest posting is a good way to get more traffic and readers for both bloggers. Another way to connect with other bloggers is to do a Sponsor Swap- exchanging sidebar buttons with each other.

Thanks Katie! This was a great interview-stay tuned for more!

Pin It!

Wednesday, February 6, 2013

Real Places to be Inspired

So many of us crafters tend to find inspiration by looking on the internet. We use blogs, product websites, social media, etc. It's fun and fast-we like finding instant inspiration gratification. However, sometimes it's not so instant and we wind up spending hours browsing Pinterest or a craft website and still don't stumble upon the 'Aha!' moment we were looking for. Using the internet to find inspiration can be extremely frustrating, which brings me to the point of this article: R-E-A-L brick-and-mortar places to find inspiration. Places that require you to get up and go. Sometimes a little movement is all we need.

The Library
Has it been awhile since you've been to the library? Believe it or not, your library is a hotbed of crafting inspiration. Most libraries have copies of all the latest craft books available for you to check out. In addition, take a look through photography books, back issues of magazines, find a new type of craft to try, pick up some interior design books.

Take a Train Ride
50.5% of the world's population lives in urban areas. Chances are, you're one of the 3.5 billion people who live in the city. Public transportation in the cities is cheap and you can get to many places. However, the idea here is not to get somewhere, it's just to ride the train or the subway. Grab a notebook (no iPads or laptops-no electronics!) and hop on the train and just write, doodle, make lists, whatever could jump start your inspiration. 

Coffee Shops
The title of this source of inspiration is pretty obvious. A hot cup of coffee, a fruity smoothie, bubble tea; whatever your favorite drink is, it's bound to make you feel better. Instead of making it your reward, just for a day, make it your motivation. Not to mention, coffee shops usually have great art, great music, and a fun and inspiring atmosphere.

College Campus
Does your blog or your craft involve fashion? The your local college campus is the place you should go to people-watch. College students will always be wearing the latest trends and it's fun to be inspired by what people are wearing. Want to find hipsters, athletes, girly-girls, business professionals, nerds, etc, all in one place? Campus is the way to go.

Quilt Shops
A quilt shop is a fantastic place to find inspiration. Now, when I say quilt shop, I don't mean a craft supply store like Michael's or Hobby Lobby, I'm talking mom-and-pop quilt and fabric shop. They tend to be super quirky, full of cute little grandmas, and gorgeous fabrics from ceiling to floor. Even if you're not someone who works with fabric, pop inside to take a look at patterns and color schemes.


Thanks for reading, I hope this inspires you to try a new source of inspiration! Where is your favorite place to go? I'll shamefully admit to Starbucks :) but I also l-o-v-e the library and riding the train. 
-Taylor


Pin It!

Thursday, January 31, 2013

Publishing Your Blog on Amazon Kindle


Do you read blogs or magazines on your Kindle or e-reader? Do you know people who do? Did you know that you can get your blog published as a monthly subscription on Amazon Kindle? I'll briefly explain why and how you should publish your blog for Kindle to promote your blog and gain new readers.

Why You should Publish on Kindle
It's unbelievable how big the eBook world is right now. Even more incredible is how many people there are that read newspapers, magazines, and blogs on their e-readers, and pay for monthly subscriptions online, just as they would for paper copies of the same publications. There are thousands of blogs available to read through your e-reader. If you have a blog, you are choosing to promote your art or express your thoughts to the digital world. On the internet, new places to promote your blog continuously appear and grow very rapidly. Amazon Kindle is just one of the many spaces that has recently emerged as a popular way to read blogs. 

How it Works
Signing up to become a Kindle blog publisher is quick and easy. After creating an account, It's easy to follow the steps to create  your kindle-blog. You'll need your URL, a screen shot of the blog, the blog header, and a description of the blog. Note: Amazon sets the price of your monthly subscription and you receive about 30% of the total subscription price.

Pin It!

Wednesday, January 30, 2013

Living Room Makeover


I'm so excited to share pictures of my living room makeover. I painted my couch mint green (one of my favorite colors!!) sewed some new pillows, made new wall art, and incorporated some of previous craft projects. Unfortunately...I managed to delete my "before" pictures. The only one I have to share with you is a photo of my cat asleep on my couch, just so you can see how wild (awful) the cover for this sofa really was. 

Really crazy, huh? Anyway, there were just too many colors in that pattern, it was so overwhelming. I gave my living room a pastel-themed makeover, (pastels are super in right now, aren't they?) mainly coral and mint, gold and silver. See the pics below.


I am in love with the minty-ness of my couch. Plus, it's now much more durable thanks to the paint. In case you're wondering, I mixed regular interior semi-gloss paint with textile medium, which turns regular paint into "fabric paint." It's going to be super easy to keep clean, dirt just wipes right off. I also think that with a solid colored couch, it will be much easier to change trends/designs now. FYI, this is an IKEA Klippan Sofa. 

See how I did the chair restyle here. Want to make your own tribal baskets? See the tutorial here. Confetti art? Tutorial here. Also, keep an eye out for a tutorial on how to make your own geometric art soon!
Pin It!

Tuesday, January 29, 2013

Mini Hand-cut Hearts Garland DIY


Okay everyone, I'm excited to share a fun and quick valentines craft with you! But...I'm even more excited to share it with you because I've written it in a totally new format. So please, please tell me what you think! I really like how fun flipping through this tutorial is, so tell me if you agree. Also, please let me know if you have any problems with it! 


Thanks for reading! -Taylor
Pin It!

Monday, January 28, 2013

Tips for New Bloggers


Take a Look Around
What made you decide to start your blog? Who inspires you? Write these things down. Work them into the 'about' page of your blog. Defining these things-what you want your blog to feel like, what you do and don't like about similar blogs- will help you as you grow personally and publicly as a blog writing.

Ask for Help
We all have weak spots (and strengths of course!) that we could use some help with. Evaluate your blog or writing and try to determine what yours are. Or, ask someone else to give you some feedback. Either way, once you know what those are, it's time to ask for help. Maybe you are clueless about HTML, or maybe you are unfamiliar with social media or photography. Regardless, find someone who can lend a hand and teach you the basics. This could be a friend or family member or another blogger or online buddy. Allow them to help you make your blog better and then start practicing the skills they've taught you!

Don't go Crazy
Blogging can be super overwhelming once you've written and published that first post and the question of "now what?" sinks in...Now you've got to promote to an internet community that doesn't know who you are in spaces where you've probably never been a regular poster. Start with just one. Just pick one place to start spreading the news that you've got a great blog. That could be Twitter, Reddit, Pinterest or Facebook or one of many others. Master just one and then when you are comfortable with that, slowly build up multiple outlets of promotion. 

Find the Right Tools
At this point, you're going to need some tools. Every great venture needs tools of some kind. Here are a few I use that are super simple and great for new bloggers like myself.

IFTTT-this website is a great one to use to have your twitter or facebook (or many other apps and websites!) update for you automatically when you post on your blog. 

Pic Monkey-need help with photo editing? This is an awesome site!

Twitter-Let's just face it: like Twitter or not, the people you want to reach use it, so sign up and become a Twit.

Facebook Pages-This is how you can create a Facebook page exclusively for your blog and post on it AS your blog, NOT your personal facebook profile. I use it to allow links to my blog posts to show up in the Facebook newsfeeds of people who like my page.

Realize it Takes Time
Understand that it takes a very long time to build a blog with readers and weekly features and something special. Don't rush through your posts, try to write quality posts, not quantity posts. Translation: Fewer, but totally awesome posts, rather than a ton of posts with only pictures, or excuses about why you haven't been around to blog. The art of blogging in the online craft world is crazy difficult sometimes- but it's also a lot of fun so slow down and enjoy it. Don't worry about blog stats or the number of published comments you have or don't have. Just focus on the enthusiasm you have as a new blogger. 

Note: Next month I will be hosting interviews with some fantastic and experienced bloggers about their bests tips and advice for new bloggers. Stay tuned!
Pin It!

Friday, January 25, 2013

Pintastic Roundup: Geeky Crafts


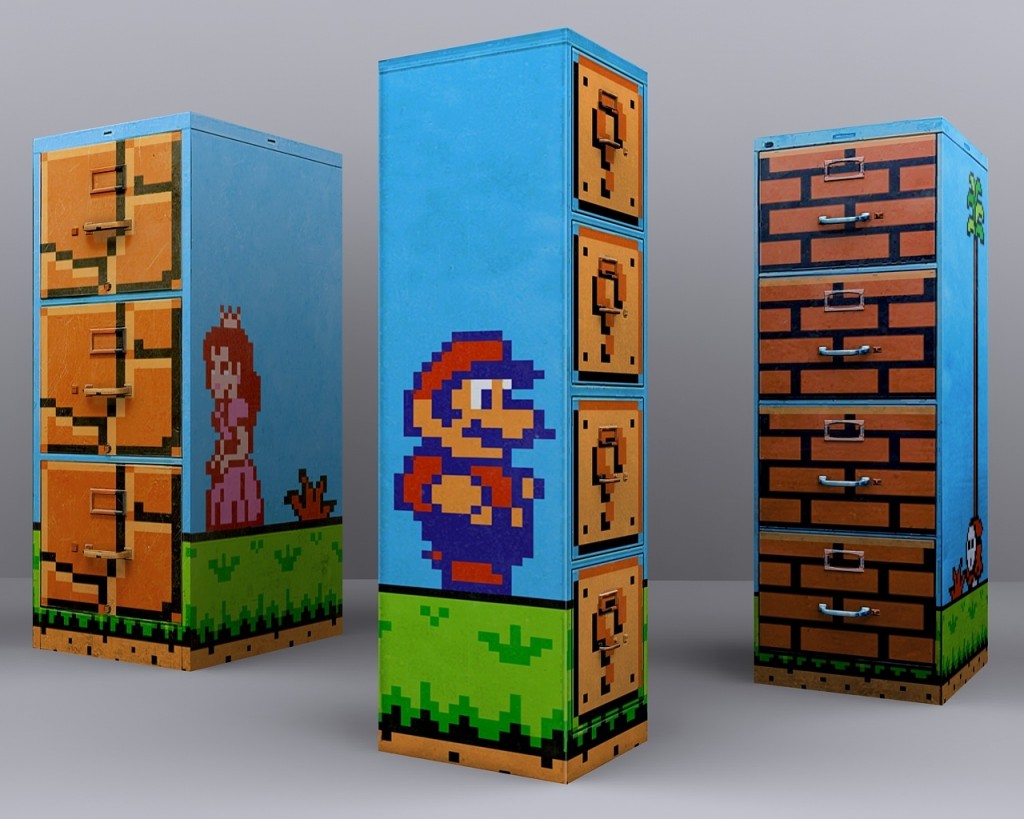
How great are these painted filing cabinets from SpriteStitch?
I love these coasters from Modge Podge Rocks!
These DIY Galaxy shoes are so cool! They're made by Time for Tea.

And I stumbled upon a DIY Katie made a while ago-it's still making its rounds on Pinterest! 

Thanks for reading this week's Pintastic roundup! When sharing images form Pinterest, always remember to provide a link back to the original post-not to the pin- so that the artist who created the project gets credit for it and gets featured!
Pin It!

Wednesday, January 23, 2013

Pinterest Tips for Bloggers


Rearrange Your Boards on Your Profile
When someone clicks on your Pinterest profile, they will be taken to your page that displays all your boards. Now, granted, we all have personal boards on Pinterest...but this is not what your bloggers and other pinners are interested in! So, you need to rearrange your boards on your profile so that when someone goes looking for the type of things you pin (and blog about) they are right at the top of your profile and easy to find. On your profile page, right next to the "Edit Profile" button, there is a small icon that says "Rearrange Boards" if you roll your mouse over it. You should be putting the boards that are most related to your blog at the top and the least related at the bottom.

Post Your Tutorials!!!
This is huge. You should be pinning your own blog posts every time you blog something. Especially if you frequently post craft tutorials as these are very big on Pinterest. At the top of any Pinterest page, there is a little button that says "Add." Use this to post a link and a photo of your post.

Categorize Your Boards to Match Your Blog
When you go looking for a dinner recipe on Pinterest, you expect to find it in the category "Food and Drink" right? Well, when people go looking for projects or posts similar to your blog, they pick the most obvious category to look in. If you post craft pins, you need to categorize the boards you pin them on as "Crafts and DIY" boards. This seems obvious, but sometimes it can be an easy thing to miss. Your boards are in the wrong category? Just edit them and correct it. 

Want to learn more about Pinterest? Here are two other articles I have written, Why I Love Pinterest, and Why Pinterest is Bad for Bloggers. Both of these articles are constructive criticisms and praises for the use of Pinterest to promote your blog. 

Here's a quick run-down if you've never used Pinterest before:
Pinterest is basically a website full of photos which link back to websites. You can collect these photos into groups (called "Boards") by "pinning them. It's essentially an online bulletin board (you remember, the one you had in eighth grade that was so cool? Yeah, that one). You can also directly post or log in through facebook. You can choose to "follow" people, so that the Pins they collect show up on your news feed when you log in to Pinterest. You can also create "group" boards where multiple people can pin things to the board you share, and you can also create "Secret" boards which only you can see (great for planning birthday surprises!). 

Thanks for reading! -Taylor
Pin It!

Sunday, January 20, 2013

This Memorable Life is now on Amazon Kindle!

Do you read by Kindle? I'm happy to announce that This Memorable Life is now available for a monthly subscription on Amazon Kindle! This means that you can read my blog on your e-reader. Blog posts will be delivered wirelessly and automatically to your e-reader each time I post something new! Interested? You can get a 14-day trial completely for free! Click here to get your monthly subscription now!

-Taylor


Pin It!

Saturday, January 19, 2013

Saturday morning project: Heart Print Jeans


This week I stumbled upon a dangerously cute DIY. Heart-Print-Jeans. I was instantly in love and I had to make my own (see pic above!). Anyway, I found the tutorial at My Little Secrets. The tutorial is easy to follow and completely inspiring, I would love to make other prints as well!

 Today I'm heading off to Miami for a shopping trip with some friends, I hope you've got something fun planned for today! Enjoy your weekend! -Taylor

Pin It!

Monday, January 14, 2013

How to Balance Blogging + a Busy Life


Now I know that we all relate to being busy, especially here in America where out culture fosters an environment of rushing through life and never having "enough time." I can certainly relate to this: I'm a full-time graduate student who writes ALL day, I'm also a teaching assistant (I teach Introduction to Philosophy), AND I tutor student athletes. Then there's exercise, going to the beach (1 mile from my house!), play time with my cat, etc. And somewhere in there, I choose to fit in blogging. Choose is the key word; if you want to find time for your blog consistently, you must choose to make it fit in. Sometimes this is easier said than done...but I've got a few tips to share with you that can help you make blogging a happy and stress-free experience. 

Write it into your Schedule!
If you want to make time for blogging, you need to do so in the same manner you make time for work tasks or homework or things around the house. Write it down, put it into the to-do list on your smart phone. Look at your schedule and decide when you can make the time. Maybe it's time to do some rearranging or maybe you can multi-task other things so that you can free up some valuable blogging time.
Make a List of all the Things You Do for Your Blog 
It's really important to understand exactly what you do (and how much!) for your blog. You make not realize things you are doing are blog related. These could be research on the internet things or crafting supply shopping things, etc. In this list, be sure to include the marketing aspect of your blog. This includes Pinterest, Twitter, Facebook, etc. All of these things ADD UP, and if you want to successfully manage your time blogging, you need to be aware of all the work you put into your fabulous blog!

Prioritize What YOU Want to Write About
This is especially important. Don't decide to write a post or series of posts simply because it's what you think people want to read or because someone asked you for it but you don't think it's a good idea. If you don't want to write it, it will take a large chunk out of what could be enjoyable blogging. This being said, make it a priority to write your favorite posts FIRST. You'll get through those the fastest because you know exactly what you want to do. In my own blogging, I write my articles, like this one first, and then later write craft tutorials, and lastly the roundups, like my weekly Pintastic feature. 

Don't Become a Slave to Your Blog
Here are a few things to keep in mind: don't let blogging take over your life. If you have a job outside of blogging, do not let your blog consume your responsibility for daily tasks (same goes for you college students). This is simply a warning to keep your blog from becoming something that causes stress. So keep it positive and keep it in perspective.

Let Your Blog Have a Place in Your Life
If you have a long daily commute via public transportation, why not use that time to brainstorm or write posts? If you wait to pick your kids up from school every afternoon in your car, why not download a blogging app on your smartphone and work on the go? Allow yourself to find a place for blogging in your life if it is something you really enjoy and really want to pursue. 
Pin It!

Friday, January 11, 2013

Why Pinterest is Bad for Bloggers


Last week, I wrote an article about why Pinterest is so great. This week's article defines why Pinterest can, at times, be not so good for bloggers and handmade sellers.


My Mind is Going (And so is your day...watch as it flies away)
It is so incredibly easy to just pin things, and pin things...and pin things. All Day. Before you know it, you have used up all that precious time you set aside out of a busy day to craft...pinning things. I have this running joke with my mom and my sister that when one of gets on Pinterest, our motto becomes "Pin ALL the things!!" And this is totally true, if you're not careful, your crafting can just turn into pinning, where you don't actually make anything at all. You might as well be watching videos on YouTube (well, not actually, because at least you're looking at crafty things). 

Overexposure
All those pins of cute tutorials and DIYs that you're pinning? Millions of people are doing the same thing...with your photos, your tutorials, and you posts. Is this a good thing or a bad thing? Well, if you're primary goal as a blogger is have as many people see and read and appreciate your work as possible, then it's great. If you're a seller of handmade good or patterns...this may not be best for your business. Instead of selling items, your images are being distributed to millions of DIYers who are seeing your handiwork and thinking, "Hey I could make that!"

Your Pins get Spread but Your Views Don't Go Up
Here's another problem: your pins and images are getting spread around and posted in people's "I want to do this someday" boards but you aren't getting the feedback. The reason: The link on the photo doesn't come back to your blog. It's been distorted in some internet-black hole kind of thing that caused the link to be broken or sent viewers to another website.
 Make Sure You're Getting Something out of Your Pins. 
That's the moral of this story. Do your best to pin your tutorials and projects with links to that particular project, not just to your blog homepage. Treat other's pins the same way. If you share them on your blog, link back to their original post, not just to Pinterest. That's how links get sucked into the internet black hole. 

To read my previous article on why Pinterest is so awesome, click here. Want to know what Pinterest is and how it works? Read below. 
Here's a quick run-down if you've never used Pinterest before:
Pinterest is basically a website full of photos which link back to websites. You can collect these photos into groups (called "Boards") by "pinning them. It's essentially an online bulletin board (you remember, the one you had in eighth grade that was so cool? Yeah, that one). You can also directly post or log in through facebook. You can choose to "follow" people, so that the Pins they collect show up on your news feed when you log in to Pinterest. You can also create "group" boards where multiple people can pin things to the board you share, and you can also create "Secret" boards which only you can see (great for planning birthday surprises!). 
Pin It!