Wednesday, February 27, 2013

A Guide to Storytelling

Once upon a time...


Good morning everyone,

As you know, this week's theme on my blog is writing and being better at it. I'd like to take a moment to encourage you, especially if you think you aren't a good writer. There are lots of different types of writing; finding one that works for you is the key to thinking and feeling like a good writer. Today, I'm talking about storytelling. This is not something we typically think of when we talk about craft blogging, but it certainly can be a fun and important part of your writing.

This infographic on the left is Pixar's Guide to Storytelling, which I found both highly creative and inspiring. Often when we start to write something personal or story-like on our blogs, we don't know where to begin, what to share, what not to share, and so on. I wanted to share this infographic because it includes some important steps in storytelling and more importantly, in what order they should go.

And they all lived happily ever after...

 I think it's extremely important to know the outcome (the ending) before writing the body of a blog post or a story. It's easy to get off track or distracted without knowing the outcome and when this happens, it means the reader will get just as lost as well. Lost readers are bad...lost readers lose interest, which is exactly what we all want to avoid.

Write just to write. Nothing more.


It's also important to realize that not every story you start will be finished. And this is okay. Finishing is, obviously, the goal, but sometimes it's more important to simply start and practice your skill rather than to have a final product. Writing is a process, one that is repeated over and over, and really requires no ending to still be considered good writing. Writing without an ending will help you push your boundaries and make you more comfortable telling stories on your blog or in your other writing.

Share your stories...


Having just said it's okay to not finish a story, I'd like to say at this point, that you really should finish and publish your favorite stories. If you love them, chances are your readers will too.

Don't be afraid.

It's often scary to put our most beloved projects out on display for fear of rejection or even simply disinterest. I know in my own experiences, I often feel that with such a new blog my posts are wasted because so few people read them and I receive so little feedback. But I have to remind myself that if you write it they will come (quality writing that is). New blogs often struggle in this way. It takes time. But this time can be easily used as a way to practice and hone your art of storytelling and writing.

When you write your stories and share your words you are writing something that no one else can. No one else will interpret an occasion the way that you will and no one will express creativity exactly the same as yours. Take courage in the fact that everything you write is uniquely yours.

Be brave and be brave often. Write often.

-Taylor


Interested in other writing articles? Scroll down to see previous posts from this week about writing, including my best tips!
Pin It!

Tuesday, February 26, 2013

Be a Better Writer: Tips for Writing Better Posts Part II


Below is the second part of a series of articles I've written about writing better blog posts and becoming a better writer in general. I write these tips form my experiences as a both a graduate student who writes papers regularly and as a teacher oh reads and grades what other people write. Use these tips to help you write in ways your readers will enjoy!


Write an Outline
     The concept of internet blogging started as a way to express thoughts and present them to other people. However, blogging has become much more than that and now we, as readers, want and expect the blog posts we read to be organized and flow smoothly from beginning to end. As a writer, this means you should have an outline of your blog post. It will help you write logically, keep you on track, and allow you to finish faster, making you more productive. 

Check for Sufficiency
     Whether you are posting a recipe, a crafty DIY, or a personal story on your blog, you should be reading through what you've written to decide whether or not you've included enough information to get your point across. A recipe or a craft tutorial can fail if you've missed a key step in the instructions. A personal anecdote won't make much sense if you've left out too many details. Be sure what you're writing is sufficient to the reader. 

Be Relevant
     Now that you've worked on writing sufficiently, read your posts again to make sure you aren't going overboard. It's easy to accidentally include too much information. Maybe you've got a really funny story about your child or your pet that you want to share. This is fine of course, but share it at a time when it's relevant. Make it a separate post; don't let too much information overwhelm the high quality work you've written. 
Proofread
      Good writing does not come instantly and it does not come on the first try. Good writing is a result of good editing. I cannot stress this enough: PROOFREAD your posts and your readers will thank you. Use a spell-check, and then read through your posts to check for grammatical errors that the spell-check does not pick up. Mistakes in blog posts are signs of a careless writer and they are a distraction. Good writing, free of proofreading errors will allow your readers to focus on your content.

Enjoy these tips? See Part I of this series, posted yesterday. Check back tomorrow for even more tips! -Taylor
Pin It!

Monday, February 25, 2013

Be a Better Writer: Tips for Writing Better Blog Posts Part I

Below is the first part of a series of articles I've written about writing better blog posts and becoming a better writer in general. I write these tips form my experiences as a both a graduate student who writes papers regularly and as a teacher oh reads and grades what other people write. Use these tips to help you write in ways your readers will enjoy!

Make Lists of Ideas
    To be a better writer, you should take a look at the topics you're writing about. Making lists by topic or season will help you focus your ideas and determine what goes into each post. This technique will also help you brainstorm new topics to write about and help you when you're in "I don't know what to blog about" panic.
Start Small
    To practice better writing skills, work on improving your posts in small doses. Really focus on improving the smallest topics you write about first, and then tackle the larger ones. Pay attention to what your weaknesses and strengths are in your writing.

Take Time to Write Your Posts
    The steps that go into writing well (outlines, content, proofreading) take time and if you want to write well, you can't rush through them. Take some time before you begin to figure out what you want to say, this helps prepare you for the actual writing. 

Write Quality, Not Quantity
     The key to good writing is not to write as much as you possibly can. It's also not to find as many sources to discuss or the be as funny, or serious as you can. The key to good writing is to write something that you would read and think," this is really good quality." Don't focus on writing long posts, focus on writing something worth reading.

Enjoy these tips? Stay tuned for more tips all week! 
Pin It!

Sunday, February 24, 2013

Writing Rules to Follow


This week, all the posts on this blog will focus on writing and blogging. I hope this inspires you to break out of your comfort zone! We all need to do that sometimes...change is good. Change is creative and change is a habit of creative people. Changing your writing style, in large or small ways, will help you not only reach more readers but reach your loyal ones more effectively. 

Check back all week for tips and thoughts about writing.
-Taylor

Pin It!

Friday, February 22, 2013

Pintastic Things This Week

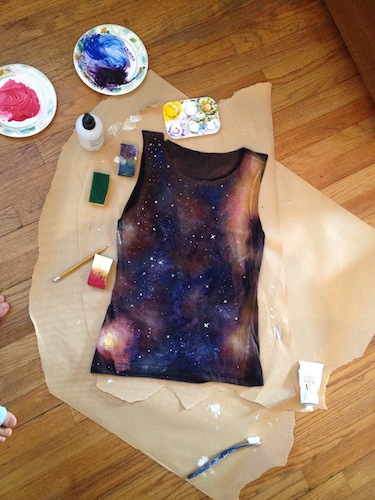
Check out this super cool galaxy shirt by How to Own It. I really want to make one of these!


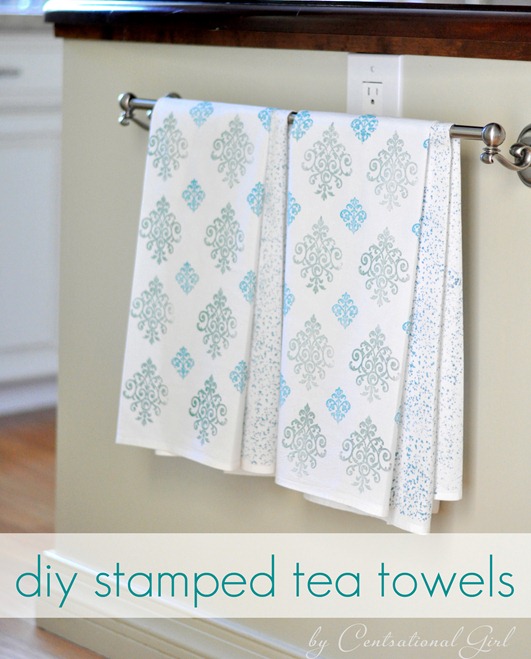
And this is the absolutely prettiest possible way to store plastic bags! I love how bright it is! By Creative Home Making with Constanca Cabral.

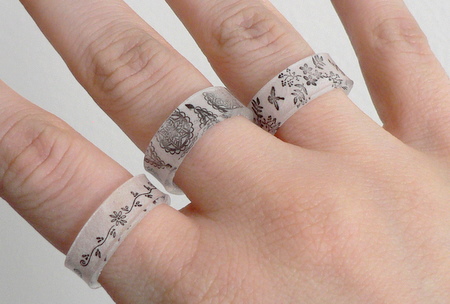
This DIY calls to my love of the feather trend! Check it out at The Crafted Sparrow.


That's it for today! In case you didn't notice, today's round up was kind of a hodge podge without any particular theme because I stumbled upon so many different kinds of interesting DIY's this week on Pinterest. 

Want to repin or blog about some of these awesome projects? Be sure to link to the original source so that the artist/author gets credit. It's really easy for something to get pinned or linked so many times that it no longer traces back to its original source and the artist receives no feedback for his or her work...so use the original source and share these lovely posts!

-Taylor
Pin It!

Thursday, February 21, 2013

Kitty Ravioli Toy DIY


Supplies:
Catnip
Fabric Scraps
Sewing Machine
Cotton or Polyester Stuffing


1. Cut 2 x 2 inch squares out of fabric scraps. 


2. Putting the wrong sides of two of the fabric squares together, sew around three sides of each set of squares. Don't sew on the very edge-sew about 1/4 inch in to make the ravioli shape.


3. Stuff with a small pinch of cotton stuffing and then sprinkle in about a teaspoon of catnip.


4. Sew up remaining side and you're done!

I whipped up a dozen of these cat toys in about fifteen minutes. My kitten loves them! His reaction to catnip is hilarious-first he plays and gets hyper and then his eyes get glazed over and he's totally mellow. It's really funny.
Pin It!

Wednesday, February 20, 2013

Scrapbooking Instax photos


Today, I thought I would share with you a pretty scrapbook page I whipped up. I've been having loads of fun taking photos with my Fuji Instax Mini camera, which takes instant photos. Now, the thing about instant photos is that they aren't digital and there is no editing them, which is both good and bad. So it's taken some practice for me to get good photos. But I also love how fast I can have photos directly at my fingertips and ready to scrapbook with. 


This page features photos I have taken of flowers that my boyfriend has given me on various occasions. Flowers are so bright and colorful, it's a great way to practice taking photos with a point and shoot instant camera.


What are your favorite things to take photos of? I also take a lot of pictures of my cat.
Want to see another great idea for using your instant photos? Check out this DIY.
-Taylor
Pin It!

Tuesday, February 19, 2013

Tips for New Bloggers-Interview Series-Kam of Campfire chic


This Spring, I'm hosting a series of interviews with accomplished and talented bloggers. We're talking about tips for us newbies and they've got some amazing answers. So, follow along, and learn with me from some of the best craft and lifestyle bloggers out there! 


Today's interview is with Kam of Campfire Chic. Here's her story: Campfire Chic is my story as a crafty camper. I share my story as a 9-5er looking for adventure and a handmade life. The posts I share encourage my readers to take risks and try new things, like camping, rock climbing, and yoga, while maintaining their current interests and responsibilities. Campfire Chic is about accepting challenges, setting achievable goals, and documenting the journey toward the finish line. I search out and share different methods for organization and goal setting because I believe that these can lead to a more productive life...which leaves plenty of time for more adventure! Campfire Chic allows me document my journey to adventure...the tale of a crafty camper.


1.      What's one super simple thing that every new blogger should be doing with their posts?
    There are quite a few things a blogger can do with a new post, but the most important? Proofread! I can’t tell you how silly I feel when I’m sitting at work glancing through my blog post for the day on my phone only to see a huge spelling/grammatical error. It’s the worst! I know that I can’t get home to fix it for a few hours, and by then, the post isn't as fresh. Proofreading your work before publishing is important. If you’re not willing to put the work in to publish good work, why should somebody read it?


2.      Did you have an 'Aha!' moment when you first started blogging that has helped you greatly? (How to do something, a nifty new trick, etc)
    My biggest Aha! Moment was when I realized I could give myself permission to not post 7 days a week. My analytics showed that my readership drops significantly on Saturday and Sunday, so why bother publishing perfectly good content on those days? Don’t feel pressured to have to stick to a specific “you’ll only be taken seriously if…” kind of schedule. Go ahead and only post on Monday, Wednesday, and Friday! Go ahead and only post once a week!

3. What's been your experience working with other bloggers and what kind of networking do you recommend?
    I have three years of experience working with other bloggers in different ways. I submit guest blog posts, host and participate in blog parties, co-host a semi-annual journaling challenge known as 30 Days of Lists, contribute to ebooks, you name it! Depending on your niche, I would avoid calling it networking and thinking more along the lines of building relationships. Some of these relationships are going to be more professional in nature, but it is still a relationship!

     When interacting with other bloggers, I suggest being yourself, being honest with deadlines and expectations, and being open to possibilities. Maybe you were hoping to get a guest blog post from a sewing blogger but ended up planning a co-hosted series of posts! The possibilities are endless, it just takes a little bravery to jump on board. 


Thanks Kam for a great interview! What I love about Kam's blog is her mix of crafty and DIY lifestyle things with informative and interesting posts about being a blogger. She has some amazing articles about meeting your blog goals and being more productive! Thanks for reading and check back soon for more interviews!
Pin It!

Monday, February 18, 2013

5 Minute DIY: Color Blocked Feather Bookmarks

This morning I was browsing pretty things on Anthropologie's website. My relationship with Anthropologie is like this: You know that super cool, super impressive person that you think is so far above you, they'll never look down and see you exist? Well, Anthropologie's that person and I'd like to think some day we'll be friends (when they drop their prices dramatically). Anyway, This DIY is inspired by some of the cute little charms they have in their shop.

Supplies:
Neutral-color scrapbook paper (beige, white on white, gray, etc.)
Colored paper scraps
adhesive, doodling pens

1. Hand cut 6-7 inch feathers from neutral-color paper. Shoot for whimsical-no need to cut each feather exactly the same!

2. On the bottom third of each feather, glue on a colored scrap and trim to fit the feather.

3. Doodle on cute messages and mark your place in your favorite books!

Pin It!

Thursday, February 14, 2013

Crafting with Cats

Do you have a pet? Do you have one who gets super interested in what you're doing the minute you pull out the craft supplies or start taking photos? Does your cat or dog look at you like, "You're taking a picture?? Is it of me?? How do I look??" 

It's always kind of chaos trying to craft with a six month old kitten. Tonight, I was scrapbooking and had a box of stickers out on the table. Kittens can't resist boxes of course, so he launched himself into the box and was determined to sit on the stickers all night. Just for fun, I thought I'd share a few photos that have been cat-bombed and instances when I was trying to craft and my cat Sisko had other ideas. 

Trying to take pictures of my jewelry display...

 Sewing and stuffing pillows-the stuffing became a pillow for nap time.
Every time I blog...this is Sisko's "play with me" face :)

My kitten brings lots of smiles to my face, so I thought he deserved a blog post and maybe he put a smile on your face too. Does anyone else have any funny photobombs with their pets?

Pin It!

Wednesday, February 13, 2013

Valentines DIY: Jar O Dates

Need a quick, last-minute gift idea for valentines? I've got one for you today! Whip up a jar of dates to last a whole year! See the tutorial below.


Supplies:
Popsicle sticks (I bought my pre-printed at Michael's).
Ribbon Scraps
Empty Jar
Stickers (for decoration)

1. Tie all your ribbon scraps around the rim of the jar. This is a super fast way to decorate!

2. Write fun date ideas on your Popsicle sticks. I had five different kinds of sticks, so I made these types into categories, weekend dates that require planning, stay at home dates, etc.


3. Decorate your jar and you're done!

4. Take pictures...get photo-bombed.... (this is obviously not a step, but, my cat frequently does this so I thought I would share a photo).


Pin It!

Tuesday, February 12, 2013

Tips for New Bloggers-Interview Series- Katie of Punk Projects


This Spring, I'll be hosting a series of interviews with accomplished and talented bloggers. We're talking about tips for us newbies and they've got some amazing answers. So, follow along, and learn with me from some of the best craft and lifestyle bloggers out there! 
Today's interview is with Katie of Punk Projects. Katie is a DIY artist of all sorts-mixed media, scrapbooking, painting, sewing, jewelry-making and so much more. Her publications include Creating Keepsakes, she will be featured in a craft book coming out Summer 2013, and is on several design teams. In addition, she runs her own blog design business. She also happens to be my amazingly talented sister! Read below for her tips for new bloggers!


1. What's one super simple thing that every new blogger should be doing with their posts?
Promote them! I recommend frequently posting about your blog on both facebook and twitter, as well as submitting your posts to other blogs, like CraftGossip.
2. Did you have an 'Aha!' moment when you first started blogging that has helped you greatly? 
Most of my “Aha” moments have been photography and photo editing related. My best suggestion is to work on your own photography, and if you don’t own a software like Photoshop (which can be expensive, I know. I’m lucky to have won a copy in a contest!) try using an online photo editor, like PicMonkey and learn how to edit your photos.
3. What's been your experience working with other bloggers and what kind of networking do you recommend?
I’ve done a lot of guest posting on other blogs, and having other bloggers post on my blog. Guest posting is a good way to get more traffic and readers for both bloggers. Another way to connect with other bloggers is to do a Sponsor Swap- exchanging sidebar buttons with each other.

Thanks Katie! This was a great interview-stay tuned for more!

Pin It!

Monday, February 11, 2013

5 Minute DIY: Instax or Polaroid Photo Magnet

I love sharing fast DIY projects. Sometimes, you just want instant craft-gratification, right? This is one of those. I recently got a Fuji Instax camera and I'm having fun learning how to use it. It takes some getting use to-it has quirks. But hey, for a camera with instant film, it's pretty nifty. I like having pictures quickly, when I'm not concerned with a completely flawless photo, or one that I need to edit. As a rookie photographer, I really like the freedom to just take the photo, no processes after that. So....here's one of the things I like to do with my fast photos:


Notes: I like to recycle whenever possible, so the magnet strips come from a printed advertisement magnet, instead of craft sheet of magnets (just a good way to reuse!). I also like to jot down a word or two on the corners of my photos to remind me why the photos are special!
Pin It!

Thursday, February 7, 2013

Following the Color Trends: Lavender

One of the prettiest colors this spring is Lavender. This lovely shade of purple is currently a hot spring color, but the truth is, lavender stays in style. Lavender has been a popular color in just about every style decade (from pale 1950's dresses to boxy 1980's suits). It's super pretty right now because it compliments the other popular colors right now-mint green, pale pink, coral, and sea foam green. 

How do you work lavender into your lifestyle? It goes really well with soft skirts and I love the idea of wearing lavender ballet flats with my outfits. It would also work well in beautiful spring artwork to display in your home. Pair it with bright whites, mint greens, and other bright colors. Avoid black and dark colors; this season's lavender should stay bright and cheerful.

Images: 1, 2, 3, 4.
Pin It!