Saturday, May 18, 2013

Star Trek Blog Hop: Cupcakes!


I'm so excited to be participating in Katie's Star Trek blog hop today! There are many other bloggers with great projects. To find the whole list, scroll to the bottom of this post. I'm happy to share with you my project, Star Trek-themed cupcakes! I've included a tutorial for several designs below!

Star Trek Uniform:
1. Ice in red, blue, or gold (eat the redshirts first!) The easiest was to get a smooth cupcake is to ice a very thick layer on first, making sure you go all the way to the edges, and then hold your spatula vertically against the cupcake and scrape off excess icing from the sides. Then, hold your spatula level horizontally with the top of the cupcake and very lightly skim across it for a smooth finish. 
2. The uniform details are quite easy, just a black triangle for the top and pipe on the insignia!


Star Trek Enterprise:
1. This cupcake is more show than tell, so ice the cupcake (as discussed in the previous tutorial), and then, using grey icing, pipe on the general outline of the enterprise. Fill in the shape.
2. Using black icing, add teeny details on the various parts of the ship.


Star Trek Faces:
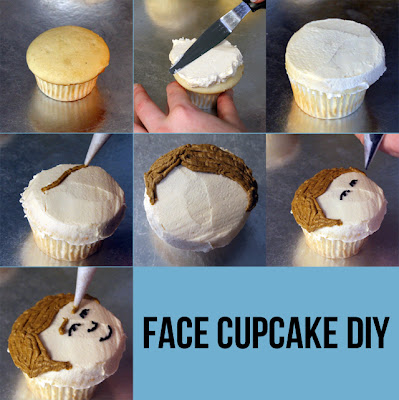
1. Ice in skin-colored icing. Then pipe on the facial details. I found it easiest to pipe in this order: hair, face, eyebrows. Easy-peasy!

TIPS:
1. You can use a toothpick to mark out a pattern for piping. I did this with Kirk and Spock's hair and found it very helpful.


2. Get crafty and make speech bubbles! Our quotes are from the new series and were a cute addition to the Starfleet uniform cupcakes.


Thanks for reading! 
-Taylor


Pin It!

Saturday, May 4, 2013

National Scrapbook Day

Katie and I did a bit of scrapbooking and card making today. I've been trying to use up my stash a bit so I used a lot of paper scraps in these projects.
Layout for Creating Keepsakes Paper Scraps challenge, Recipe Challenge on Paper Lovers Studio and the Color challenge by Basic Grey.

 Card for card challenge by Basic Grey

Card for  Stamped Background Challenge at Studio Calico
Card for the  5 Patterned Papers Challenge by Studio Calico

Happy National Scrapbook day! Challenges are super inspiring to me and there were a ton to choose from today. :)

-Taylor
Pin It!

Saturday, April 13, 2013

Scrapbooking on a Bright White Background

Hello everyone!

It's been awhile. It's the end of the semester, a drop-dead-exhaustion kind of week. The end is in sight, but I've got to put my glasses on to see it. Okay not really, but you get the idea. I have managed to squeeze in a little bit of scrapbooking time here and there. I've been really inspired by the new Paper Lovers Studio blog lately. They've got some awesome challenges and freebies are always nice.

I've decided that for the time being, while I try and rediscover what I liked about scrapbooking and why I want to continue doing it, I'm going to make white my signature background color. It keeps things minimal, focuses on the photos and the journaling. I'm a big fan of white in scrapbooking these days. It's so clean and focused. So here are the layouts I've been doing.


This one was for the Paper Lover's "tough supply" challenge. I love transparencies but I find them so hard to use. When I made this layout, I discovered how easy it is to attach a full page transparency to a background using washi tape! If you look closely on the edges of the page, I used washi tape to adhere my transparency sheet.

2. I love how this layout turned out. It's exactly what I've been feeling in my minimalist-scrapbooker vibe. It's clean and calming, rather than overwhelming and stressful. The beach photo evokes calming, cool colors so I tried to mimic that in my page design.


3. Scrapbooking Jamaica! Even though Jamaica was my least favorite stop on the cruise the boyfriend and I took last year, I still wanted to scrapbook a few of the nicer photos. My journaling talks about how colorful everything was, even though Ochos Rios itself was disappointing and not very clean. 

I'm happy to be getting back into scrapbooking. I think it's the crafting I'll stick to for awhile. It's very personal and I don't feel tied down to any tedious projects. 

Pin It!

Tuesday, April 2, 2013

Reentering the scrapbooking world

I've been doing a lot of blog reading this week and I discovered I'm not alone out there in thinking scrapbooking has just gone crazy. It's become something it was never supposed to be. But still, I want to scrapbook because telling a story is beautiful. So that's what I will do with my supplies. Here's my first layout, my first jump back into scrapbooking. This is inspired by the sketch challenge at Paper Lovers Studio, an awesome new scrapbooking challenge blog.

I'm really into mint, peach, and salmon, so I tried to incorporate those colors in my layout. Since my scrapbooking is about storytelling, I've decided to share some stories here as well. My boyfriend and I went to Flamingo Gardens in Davie, FL, over spring break. It's this crazy botanical garden gone wild, mixed with swamp, mixed with animal sanctuary. In addition, it's got this island vibe (which really just means everything smells moist and on one is in a hurry to do anything!) that seems to say its glory days are long gone. Anyway, it was a fun, if not quirky place to visit.

I would say my venture back into papercrafting has gotten off to a good start. Any tips to take photos of scrapbook layouts with getting a glare on the photos?

Pin It!

Friday, March 29, 2013

Sugared Lime Spring Wreath DIY


I found this website, Design Seeds, through my sister Katie. Anyway, I need I wanted to make a spring wreath, and when I saw this beautiful color scheme of various limes on Design Seeds that I had my inspiration. I love how bright lime can be, yet in this color scheme, the lime is subtle and serene. Enjoy my wreath tutorial below and my take on these beautiful shades of spring green.

Supplies:
Paper Flowers
Ribbon Scraps in different shades of lime green
Plain Straw Wreath
Muslin or Canvas Scrap 12" long (to hang the wreath with)
White Acrylic Paint
Lace Paper Doilies


1. Paint on polka dots first. I used a cosmetic sponge to make my dots, but if you don't already have a circular sponge, you could easily cut one from a regular sponge.


2. Tie your muslin scrap onto the top of the wreath. Layer your ribbons on one side of the wreath and pin in place. 


3. Hot glue ribbons in place at the top of each ribbon. Add a lace paper doily on top of the ribbons.


4. Glue paper flowers on top of lace doily. Arrange the flowers in an odd number for the most aesthetic appeal. Three or five flowers will look best. 


5. Enjoy your wreath, hang it in the sunshine to greet your spring visitors and enjoy your spring!


Pin It!

Thursday, March 28, 2013

Bunny Garden Rocks


Katie and I whipped up this project a few weeks ago. Toss these cute little rocks into your garden. They're easy on your supplies too, you only need white and black paint pens and small rocks or stones.


Draw on white bunnies first, then use a finer black pen to add on details. With other colors, you could easily make chicks, ducks, Easter eggs, flowers, or other spring-y designs.


What do you think? Have any decorated rocks in your garden?

Thanks Katie, for sharing this DIY!
Pin It!

Wednesday, March 27, 2013

Scrapbooking: Finding a new perspective

Sometimes we get discouraged as bloggers. I've been feeling this way recently and haven't blogged for a couple of weeks as a result. Sometimes it's hard to judge the response that you will get for publishing a post, or whether you will get any response at all. I apologize in advance if this post seems somewhat gloomy, but I'll try to end on a positive note. Lately, I've been feeling overwhelmed by craft things. There's just so much. Pinterest, social media, product shopping- all of these are online just to start with- and then when you actually craft something, the amount of supplies is just unfathomable. 

Why can't we simplify? The variety in craft products available is in a way, crossing the line from memory-making to cold consumerism. Why do we really need a million different letter stickers to tell a story? Granted, I love scrapbooking and craft supplies just as much as the next crafter/blogger, but at the moment it's rather overwhelming. It's not fun anymore. I need to find a new perspective, a new way to create, one without that doesn't leave me feeling stressed that I didn't use enough supplies, or the "right" ones, or just that I didn't complete enough. This being said, I'm going to try and find a simplified approach to scrapbooking.

I decided to just order some of my photos from Snapfish, rather than spending hours editing them on the computer and printing them in varying sizes at home. 4 x 6 prints will still tell my story. Katie has been telling me about Project Life and while I like the idea, even it requires MORE supplies, more consumption. I want to use what I have without stress. So, here's to trying a minimalist approach. One where I scrapbook just to tell a story. I'm no longer going to be so concerned with creating a "trendy piece of art." I'm going to try and find the purpose of scrapbooking again.

Has anyone else felt this way recently or at some other point? What's your stress-free scrapbook style?
Pin It!

Tuesday, March 26, 2013

Quick and Easy Painted Bunnies


Hello everyone,

It's been awhile. Sometimes I just need to step back. Take a break, breathe, have some "think" time. I've been extremely busy teaching this semester, and doing lots of my own writing as well. For a few weeks, I kept thinking, "I just can't do this blog thing anymore, it's just too much." Now, I think, for the moment, I want to continue. But my posts will be a little less frequent for the time being. Sanity throughout the semester is important. 

This project was a wild goose chase. I had this great idea that I would paint plastic bunnies shiny and gold and use them for crafts this spring. So I go looking for plastic bunnies and couldn't find them anywhere. I checked Target, Hobby Lobby, Michael's, etc, and couldn't find small plastic ones, only plus bunnies. Finally, I found some at Wal-mart, who knew, right? Then I went to paint them with my favorite gold paint, Liquid Leaf, but the bottle had self-sealed and I couldn't open it. I was about to give up on the bunnies when my sister suggested nail polish. Genius! So, the DIY was still on. Enjoy the pics! These cute little bunnies have so many possible projects waiting on them! I decorated a candle (see pic above), but there are so many more DIYs just waiting to happen!
1. Prep: I used white polish to paint over the bright pink and black details.
2. Painting the bunnies took about 2 coats each. I painted them neon yellow, pink, gold, and mint. (My current favorite colors!)
 3. Let them dry between coats!


Pin It!

Monday, March 4, 2013

Kitty Key Chain DIY

Hey you guys, Katie here. As you probably know, Taylor has a kitten named Sisko. (If you didn't know, she's blogged about the joy of crafting with a cat here.) I made this EASY key chain with a little doodle of Sisko on it, and I'm going to show you how I made it.


Supplies: Chipboard Charm, Acrylic Paint, Sharpies, Key Ring, Jump Rings

1. Attach 4-6 jump rings in a chain and attach one end to the key ring.
2. Paint your charm a solid color. (guitars aren't what I wanted.) I chose white.
3. Using your sharpies doodle a kitty (or puppy if you're a dog person!) and a cute word.
4. Coat with mod podge to seal and attach to key ring with a jump ring.
That was probably the easiest key chain you've ever made! ;)

Want more DIY's? Hop over to my blog, Punk Projects!
Pin It!

Wednesday, February 27, 2013

A Guide to Storytelling

Once upon a time...


Good morning everyone,

As you know, this week's theme on my blog is writing and being better at it. I'd like to take a moment to encourage you, especially if you think you aren't a good writer. There are lots of different types of writing; finding one that works for you is the key to thinking and feeling like a good writer. Today, I'm talking about storytelling. This is not something we typically think of when we talk about craft blogging, but it certainly can be a fun and important part of your writing.

This infographic on the left is Pixar's Guide to Storytelling, which I found both highly creative and inspiring. Often when we start to write something personal or story-like on our blogs, we don't know where to begin, what to share, what not to share, and so on. I wanted to share this infographic because it includes some important steps in storytelling and more importantly, in what order they should go.

And they all lived happily ever after...

 I think it's extremely important to know the outcome (the ending) before writing the body of a blog post or a story. It's easy to get off track or distracted without knowing the outcome and when this happens, it means the reader will get just as lost as well. Lost readers are bad...lost readers lose interest, which is exactly what we all want to avoid.

Write just to write. Nothing more.


It's also important to realize that not every story you start will be finished. And this is okay. Finishing is, obviously, the goal, but sometimes it's more important to simply start and practice your skill rather than to have a final product. Writing is a process, one that is repeated over and over, and really requires no ending to still be considered good writing. Writing without an ending will help you push your boundaries and make you more comfortable telling stories on your blog or in your other writing.

Share your stories...


Having just said it's okay to not finish a story, I'd like to say at this point, that you really should finish and publish your favorite stories. If you love them, chances are your readers will too.

Don't be afraid.

It's often scary to put our most beloved projects out on display for fear of rejection or even simply disinterest. I know in my own experiences, I often feel that with such a new blog my posts are wasted because so few people read them and I receive so little feedback. But I have to remind myself that if you write it they will come (quality writing that is). New blogs often struggle in this way. It takes time. But this time can be easily used as a way to practice and hone your art of storytelling and writing.

When you write your stories and share your words you are writing something that no one else can. No one else will interpret an occasion the way that you will and no one will express creativity exactly the same as yours. Take courage in the fact that everything you write is uniquely yours.

Be brave and be brave often. Write often.

-Taylor


Interested in other writing articles? Scroll down to see previous posts from this week about writing, including my best tips!
Pin It!

Tuesday, February 26, 2013

Be a Better Writer: Tips for Writing Better Posts Part II


Below is the second part of a series of articles I've written about writing better blog posts and becoming a better writer in general. I write these tips form my experiences as a both a graduate student who writes papers regularly and as a teacher oh reads and grades what other people write. Use these tips to help you write in ways your readers will enjoy!


Write an Outline
     The concept of internet blogging started as a way to express thoughts and present them to other people. However, blogging has become much more than that and now we, as readers, want and expect the blog posts we read to be organized and flow smoothly from beginning to end. As a writer, this means you should have an outline of your blog post. It will help you write logically, keep you on track, and allow you to finish faster, making you more productive. 

Check for Sufficiency
     Whether you are posting a recipe, a crafty DIY, or a personal story on your blog, you should be reading through what you've written to decide whether or not you've included enough information to get your point across. A recipe or a craft tutorial can fail if you've missed a key step in the instructions. A personal anecdote won't make much sense if you've left out too many details. Be sure what you're writing is sufficient to the reader. 

Be Relevant
     Now that you've worked on writing sufficiently, read your posts again to make sure you aren't going overboard. It's easy to accidentally include too much information. Maybe you've got a really funny story about your child or your pet that you want to share. This is fine of course, but share it at a time when it's relevant. Make it a separate post; don't let too much information overwhelm the high quality work you've written. 
Proofread
      Good writing does not come instantly and it does not come on the first try. Good writing is a result of good editing. I cannot stress this enough: PROOFREAD your posts and your readers will thank you. Use a spell-check, and then read through your posts to check for grammatical errors that the spell-check does not pick up. Mistakes in blog posts are signs of a careless writer and they are a distraction. Good writing, free of proofreading errors will allow your readers to focus on your content.

Enjoy these tips? See Part I of this series, posted yesterday. Check back tomorrow for even more tips! -Taylor
Pin It!

Monday, February 25, 2013

Be a Better Writer: Tips for Writing Better Blog Posts Part I

Below is the first part of a series of articles I've written about writing better blog posts and becoming a better writer in general. I write these tips form my experiences as a both a graduate student who writes papers regularly and as a teacher oh reads and grades what other people write. Use these tips to help you write in ways your readers will enjoy!

Make Lists of Ideas
    To be a better writer, you should take a look at the topics you're writing about. Making lists by topic or season will help you focus your ideas and determine what goes into each post. This technique will also help you brainstorm new topics to write about and help you when you're in "I don't know what to blog about" panic.
Start Small
    To practice better writing skills, work on improving your posts in small doses. Really focus on improving the smallest topics you write about first, and then tackle the larger ones. Pay attention to what your weaknesses and strengths are in your writing.

Take Time to Write Your Posts
    The steps that go into writing well (outlines, content, proofreading) take time and if you want to write well, you can't rush through them. Take some time before you begin to figure out what you want to say, this helps prepare you for the actual writing. 

Write Quality, Not Quantity
     The key to good writing is not to write as much as you possibly can. It's also not to find as many sources to discuss or the be as funny, or serious as you can. The key to good writing is to write something that you would read and think," this is really good quality." Don't focus on writing long posts, focus on writing something worth reading.

Enjoy these tips? Stay tuned for more tips all week! 
Pin It!

Sunday, February 24, 2013

Writing Rules to Follow


This week, all the posts on this blog will focus on writing and blogging. I hope this inspires you to break out of your comfort zone! We all need to do that sometimes...change is good. Change is creative and change is a habit of creative people. Changing your writing style, in large or small ways, will help you not only reach more readers but reach your loyal ones more effectively. 

Check back all week for tips and thoughts about writing.
-Taylor

Pin It!

Friday, February 22, 2013

Pintastic Things This Week

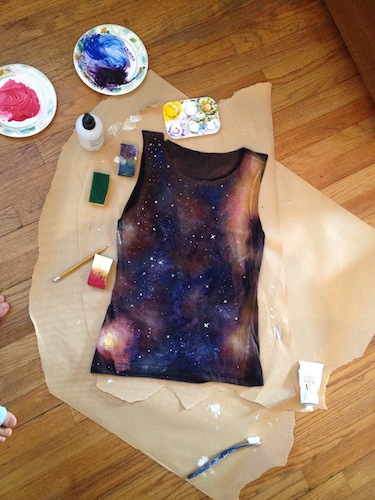
Check out this super cool galaxy shirt by How to Own It. I really want to make one of these!


And this is the absolutely prettiest possible way to store plastic bags! I love how bright it is! By Creative Home Making with Constanca Cabral.

This DIY calls to my love of the feather trend! Check it out at The Crafted Sparrow.


That's it for today! In case you didn't notice, today's round up was kind of a hodge podge without any particular theme because I stumbled upon so many different kinds of interesting DIY's this week on Pinterest. 

Want to repin or blog about some of these awesome projects? Be sure to link to the original source so that the artist/author gets credit. It's really easy for something to get pinned or linked so many times that it no longer traces back to its original source and the artist receives no feedback for his or her work...so use the original source and share these lovely posts!

-Taylor
Pin It!

Thursday, February 21, 2013

Kitty Ravioli Toy DIY


Supplies:
Catnip
Fabric Scraps
Sewing Machine
Cotton or Polyester Stuffing


1. Cut 2 x 2 inch squares out of fabric scraps. 


2. Putting the wrong sides of two of the fabric squares together, sew around three sides of each set of squares. Don't sew on the very edge-sew about 1/4 inch in to make the ravioli shape.


3. Stuff with a small pinch of cotton stuffing and then sprinkle in about a teaspoon of catnip.


4. Sew up remaining side and you're done!

I whipped up a dozen of these cat toys in about fifteen minutes. My kitten loves them! His reaction to catnip is hilarious-first he plays and gets hyper and then his eyes get glazed over and he's totally mellow. It's really funny.
Pin It!