Tuesday, July 31, 2012

Peanut Butter Brunch Muffins

You know those gourmet-looking muffins you see at Starbucks, Market Street, etc.? Well here's a secret: they can be made from your own kitchen. Who knew, right? This is a recipe I tested, and it's really great. The only change I made was adding peanut butter to the batter before baking. The streusel topping is so yummy.


-Taylor
Pin It!

Monday, July 30, 2012

Want to Help Us Adopt a Shelter Puppy?


Chelsea's Puppies- found via Adopt a Pet.
(Note: We're not sure what puppy we will be getting yet, the little guys above are just so cute!)

Katie (my Sister) and I are moving into our new apartment soon, and we want to rescue a puppy/dog from one of the local animal shelters. The only problem is that rescuing puppies is expensive! There is the fee to adopt the puppy and then there is also the pet deposit for your apartment!

All of the proceeds from our new online class- The Big 10 Art Journal Adventure -go to helping us adopt a puppy! The class starts on August 1st so hurry and grab your spot! Here's a little more about our class:
The Big 10 Art Journal Adventure is a mini class that only runs 10 days. That is 10 days of art journaling prompts and techniques to inspire you! The class will be hosted on its own private blog (not on Punk Projects) and will run from August 1st-10th. Spots are going fast-it's our most popular class yet!

10 days, 10 prompts for only $10!

What you get when you sign up for The Big 10 Art Journaling Adventure:

  • Access to The Big 10 private blog
  • 10 days of art journal prompts
  • Art journal techniques and inspiration
  • Downloadable freebies to use on your art journal pages
  • Access to the Art Journal Adventure Flickr Group
  • Student Artwork will be featured here on Punk Projects

Even if you've never done Art Journaling before, We'll have a quick tutorial on how to get started on the first day!

Summer is will soon be over and everyone will be going back to school/work soon. Get in 1 last great craft adventure before Autumn!
Pin It!

Saturday, July 28, 2012

Friday, July 27, 2012

Creative things make me happy.

I wanted to share some of my scrapbooking layouts with you. All of my craft supplies are packed in the move right now...so these are from a few weeks ago.  Enjoy! All the photos are from my amazing cross-country road trip last year from Maine to Florida.
This has been a pretty bad luck kind of week...a drunk driver hit my car, I've been sick with something icky...I know I could use some inspiration. Here's some just in case anyone else is in the same boat!
Pin It!

Thursday, July 26, 2012

Stumbled upon something beautiful....

Check out this girl's blog! Wow. It's primarily about beauty and nail design, but I can see so many ways to be inspired for other projects!
-Taylor
Pin It!

Tuesday, July 24, 2012

Air Brushed Pillows DIY


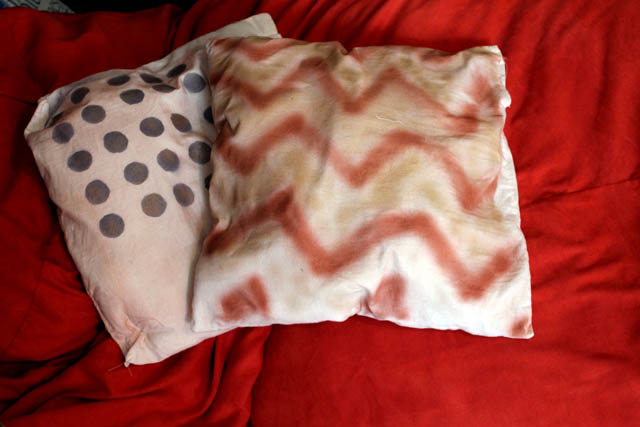
Lately, I've been wanting to try new art techniques and new crafts, so here's my first venture into fabric airbrushing. Katie and I did home decor pillows, and on her blog, you can find a cool tutorial on airburshing socks today. I chose to go with somewhat neutral colors for these cute and funky pillows, I think the pale metallic bronze, silver, and gold would match lots of other fabric combinations!

We found the ColorArtz Airbrush kit on clearance at Joanns for only $2.97 so we jumped on it! Even online it is still a really great price! Find it on the Color Artz store here.


1. Following the instructions on the box, Load your color into your airbrush.
2. For this project you will need a light colored pillow.
 3. Holding your airbrush over your pillow, spray a zig zag design.
 4. Switching out colors on your air brush, spray color between your zigzags/chevrons.
For the polka dot pillow:
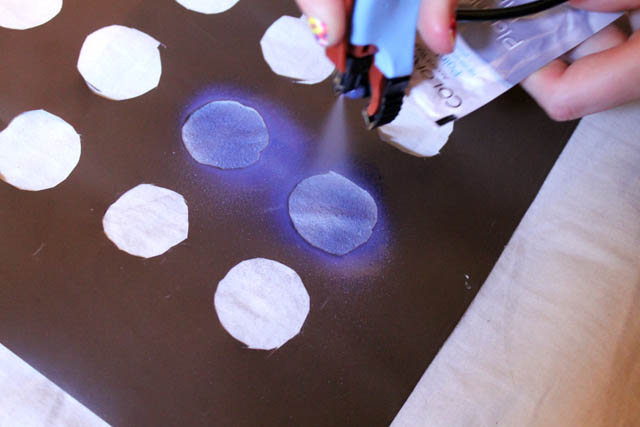
1. Trace circles onto the back of a piece of contact paper. Cut the circles out. This will be your template.
 2. Stick it to your pillow. You can do polka dots on just part of your pillow (like we did) or cover the entire thing with polka dots.
 3. Holding your airbrush over the pillow, spray color into the polka dots.
 Click here to see what Katie did with the Air Brush! Another fabulous DIY!
-Taylor
Pin It!

Monday, July 23, 2012

Chantilly Whipped Cream Icing


This is my own recipe for stabilized whipped cream icing. If you like whipped cream or whipped bakery icing, you will love this on your cakes/cupcakes. Now, I say stabilized...however, that means stabilized in temperatures less than 80 degrees. This is not an icing to sit outside all day at a birthday party or bbq. That's my disclaimer to melted icing.

Ingredients:
1 quart of heavy whipping cream
1/4-1/3 cup white granulated sugar
1 tablespoon vanilla extract

Directions:
1. First place your mixing bowl and the wire whip attachment in the freezer for 10-20 minutes. It needs to be cold.
2. Pour cream into mixing bowl and start by mixing very slowly, speed 1 or 2 depending on your mixer. (If this is a stand mixer it will only take about 3 minutes. If you are using a hand mixer it could take much longer.
3. As your cream starts to thicken, turn up the speed on your mixer. On my kitchen aid, I kick the speed up to about a 6. Beat until you reach a soft peak where the cream is just starting to hold a shape. At this point add vanilla and sugar to taste, as sweet as you like it.
4. Continue to beat cream until stiff peaks form. Beat an additional 30 seconds to 1 minute, until it is very, very stiff. Stop here. Do not overbeat your cream. If you think you have done this, you will definitely know because you will end up with butter.
5. Ice cooled cakes, cupcakes, pies, fruit, or use as a dessert filling.

Notes:
If you aren't using your whipped cream right away, store covered in the fridge. 
To color chantilly cream, add gel or liquid food color to the cream BEFORE whipping.
Do not layer colored cream on your desserts. It will bleed.
This can easily be flavored with almond, lemon, or any other extract instead of vanilla. 

-Taylor
Pin It!